View online and download Garmin Striker 4 GPS Fish finder owner manual, user guide and user manual in PDF files for free without registration. Learn about Garmin STRIKER 4 device overview, how to use the device, features, configuration, and troubleshooting guide for Garmin Striker 4.
Introduction
Device Keys
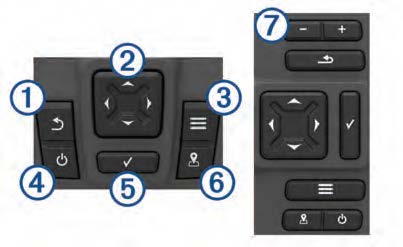
- Return to the previous screen, Returns to the home screen when held
- Scroll, highlights options, and moves the cursor. Zooms in and out of a view.
- Closes a menu, when applicable. Opens a menu of options for the page, when applicable
- Turns on and off the device when held.
Performs one or more of these actions when quickly pressed:- Adjust the backlight
- Adjust the color mode
- Enables and disables sonar
- Acknowledges messages and selects options
- Saves the present location as a waypoint
- Zooms out and zooms in to a view
Before turning on the device, you must firmly press the connectors into the appropriate holes in the device. If the cables are not pressed far enough into the device, the device appears to lose power or stop working.
Selecting the Tranducer type
If you are connecting a transducer that was not included with the chartplotter, you may need to set the transducer type to make the sonar function properly. If the device automatically detected your transducer, this option does not appear.
This chartplotter is compatible with the Garmin ClearVü™transducer as well as a range of accessory transducers including Garmin GT transducers, which are available at www.garmin.com.
- Select Settings > My Vessel > Transducer Type.
- Select the type of transducer you are using.
In this Introduction section, you can also find about how to zooming, panning, adjusting the backlight, adjusting the color mode, setting the beeper and GPS satellite Acquisition
Home Screen
The fishfinder home screen provides access to all of the features in the fishfinder. The features are dependant on the accessories you have connected to the fishfinder. You may not have all of the options and features discussed in this manual. When viewing another screen, you can return to the home screen by holding back button. You can customize the layout of the screens.
- Adding a new layout to the Home screen of the STRIKER 5 or 7
- Adding the numbers screen
- Adding the data graphs screen
Sonar
The full screen page, the split frequency page, and the flasher page are visual representations of the area beneath your boat. You can customize these sonar views.
Full screen sonar
You can see a full-view graph of sonar readings from a transducer on the full screen. Select traditional or ClearVu
Garmin ClearVu Sonar View
Garmin ClearVü high-frequency sonar provides a detailed picture of the fishing environment around the boat in a detailed representation of structures the boat is passing over. Traditional transducers emit a conical beam. The Garmin ClearVü scanning sonar technology emits two narrow beams, similar to the shape of the beam in a copying machine. These beams provide a clearer, picture-like image of what is around the boat.
SideVu Sonar View
SideVü scanning sonar technology shows you a picture of what lies to the sides of the boat. You can use this as a search tool to find structures and fish.
Split-Screen Frequency
You can view two frequencies from the split frequency screen.
Flasher
The flasher shows sonar information on a circular depth scale, indicating what is beneath your boat. It is organized as a ring that starts at the top and progresses clockwise. Depth is indicated by the scale inside the ring. Sonar information flashes on the ring when it is received at the depth indicated. The colors indicate different strengths of the sonar return.
Split-Zoom View
On the split-zoom page, you can see a full-view graph of sonar readings on the right side of the screen, and a magnified portion of that graph on the left side of the screen.
In this Sonar section you can also find how to pausing the sonar, creating a waypoint on the sonar screen using your present location and different location, adjusting the zoom, adjusting sonar frequencies, adjusting sonar gain, adjusting the range of the depth scale and setting up the sonar.
Waypoints
Waypoints are locations you record and store in the device. In this section you can follow guide about:
- Marking your present location as a waypoint
- Creating a waypoint at a different location
- Editing a saved waypoint
- Marking and navigating to a man overboard location
- Navigating to a waypoint
- Measuring distance on the waypoint map
- Deleting a waypoint or an MOB
- Deleting all waypoints
- Sharing waypoints and routes across devices
- Waypoint map settings
Routes
A route is a sequence of waypoints or locations that leads you to your final destination. In the routes section, you can read how to:
- Creating and navigating a route using the waypoint map
- Editing a saved route
- Viewing a list of routes
- Browsing for and navigating a saved route
- Deleting a saved route
- Deleting all saved routes
Track
A track is a recording of the current path of your boat. You can show your current track in waypoint map view.
- Setting the color of the track
- Clearing the track
- Managing the track log memory during recording
- Configuring the recording interval of the track log
- Deleting all saved waypoints, routes and tracks
Device Configuration
System Settings
Select Settings > System.
Display: Adjusts the backlight brightness (Adjusting the Backlight, and color scheme (Adjusting the Color Mode).
Beeper: Turns on and off the tone that sounds for alarms and selections (Setting the Beeper).
GPS: Provides information about the GPS satellite settings and fix.
Auto Power: Turns on the device automatically when power is applied.
Language: Sets the on-screen language.
System Information: Provides information about the device and the software version.
Simulator: Turns on the simulator and allows you to set the speed and simulated location.
System Information
Select Settings > Settings > System Information.
Event Log: Allows you to view a log of system events.
Software Information: Provides information about the device and the software version.
Garmin Devices: Provides information about connected Garmin devices.
Factory Settings: Restores the device to factory settings.
NOTE: This deletes any setting information you have entered.
My Vessel Setting
NOTE: Some settings and options require additional hardware.
Select Settings > My Vessel.
Transducer Type: Displays the type of transducer connected to the device (Selecting the Transducer Type).
Keel Offset: Offsets the surface reading for the depth of a keel, making it possible to measure depth from the bottom of the keel instead of from the transducer location (Setting the Keel Offset).
Temp. Offset: Compensates for the water temperature reading from a temperature-capable transducer (Setting the Water Temperature Offset).
Setting the Keel Offset
You can enter a keel offset to compensate the surface reading for the depth of a keel, making it possible to measure water depth or depth below the keel instead of depth below the transducer. Enter a positive number to offset for a keel. You can enter a negative number to compensate for a large vessel that may draw several feet of water.
- Complete an action, based on the location of the transducer:
- If the transducer is installed at the water line , measure the distance from the transducer location to the keel of the boat. Enter this value in steps 3 and 4 as a positive number to display depth below keel.
- If the transducer is installed at the bottom of the keel , measure the distance from the transducer to the water line. Enter this value in steps 3 and 4 as a negative number to display water depth. Enter a 0 in this value to display depth below keel and depth below transducer.
- Select Settings > My Vessel > Keel Offset.
- Select or based on the location of the transducer.
- Enter the distance measured in step 1.
Setting the Water Temperature Offset
You can set the temperature offset to compensate for the temperature reading from a temperature-capable sensor.
- Measure the water temperature using the temperature-capable transducer that is connected to the device.
- Measure the water temperature using a different thermometer or temperature sensor that is known to be accurate.
- Subtract the water temperature measured in step 1 from the water temperature measured in step 2. This is the temperature offset. Enter this value in step 5 as a positive number if the sensor connected to the device measures the water temperature as being colder than it actually is. Enter this value in step 5 as a negative number if the sensor connected to the device measures the water temperature as being warmer than it actually is.
- Select Settings > My Vessel > Temp. Offset.
- Use the arrow keys to enter water temperature offset measured in step 3.
Alarms Settings
Navigation Alarms
Select Settings > Alarms > Navigation.
Arrival: Sets an alarm to sound when you are within a specified distance or time from a turn or a destination.
Anchor Drag: Sets an alarm to sound when you exceed a specified drift distance while anchored.
Off Course: Sets an alarm to sound when you are off course by a specified distance.
System Alarms
Alarm Clock: Sets an alarm clock.
Device Voltage: Sets an alarm to sound when the battery reaches a specified low voltage.
GPS Accuracy: Sets an alarm to sound when the GPS location accuracy falls outside the user-defined value.
Sonar Alarms
Select Settings > Alarms > Sonar.
Shallow Water: Sounds when the water depth is shallower than the specified depth.
Deep Water: Sounds when the water depth is deeper than the specified depth.
Water Temp.: Sounds when the water temperature varies more than ± 2°F (± 1.1°C). Alarm settings are saved when the device is turned off.
NOTE: You must connect the device to a temperature-capable transducer to use this alarm.
Fish
Fish: Sets an alarm to sound when the device detects a suspended target.
• sets the alarm to sound when fish of all sizes are detected.
• sets the alarm to sound only when medium or large fish are detected.
• sets the alarm to sound only when large fish are detected.
Unit Settings
Select Settings > Units.
System Units: Sets the unit format for the device.
Variance: Sets the magnetic declination, the angle between magnetic north and true north, for your present location.
North Reference: Sets the direction references used in calculating heading information. True sets geographic north as the north reference. Grid sets grid north as the north reference (000º). Magnetic sets the magnetic north as the north reference.
Position Format: Sets the position format in which a given location reading appears. Do not change this setting unless you are using a map or chart that specifies a different position format.
Map Datum: Sets the coordinate system on which the map is structured. Do not change this setting unless you are using a map or chart that specifies a different map datum.
Time Format: Sets a 12-hour, 24-hour, or UTC time format.
Time Zone: Sets the time zone.
Daylight Savings Time: Sets daylight savings time to Off or On.
Navigation Settings
NOTE: Some settings and options require additional hardware.
Select Settings > Navigation.
Route Labels: Sets the type of labels shown with route turns on the map.
Turn Transition Activ.: Sets the turn transition to be calculated based on time or distance.
Turn Transition Time: Sets how many minutes before the turn that you transition to it as the next leg, when Time is selected for the Turn Transition Activ. setting.
Turn Transition Dist.: Sets how far before the turn that you transition to it as the next leg, when Distance is selected for the Turn Transition Activ. setting.
Route Start: Selects a starting point for route navigation. You can select Boat to start navigation from the current vessel location, or Waypoints to start from the first waypoint on the route.
Troubleshooting
My device does not turn on
- Push the power cable all the way into the back of the device. Even if the cable seems to be connected, you should push firmly so that it is fully seated.
- Make sure the power source is generating power.
You can check this several ways. For example, you can check whether other devices powered by the source are functioning. - Check the fuse in the power cable.
The fuse should be located in a holder that is part of the red wire of the power cable. Check that the proper size fuse is installed. Refer to the label on the cable or the installation instructions for the exact fuse size needed. Check the fuse to make sure there is still a connection inside of the fuse. You can test the fuse using a multimeter. If the fuse is good, the multimeter reads 0 ohm. - Check to make sure the device is receiving at least 10 Vdc, but 12 Vdc is recommended.
To check the voltage, measure the female power and ground sockets of the power cable for DC voltage. If the voltage is less than 10 Vdc, the device will not turn on.
My Sonar does not work
- Push the transducer cable all the way into the back of the device. Even if the cable seems to be connected, you should push firmly so that it is fully seated.
- Check to make sure the sonar transmission is turned on.
My Device is not creating waypoints in the correct location
You can manually enter a waypoint location to transfer and share data from one device to the next. If you have manually entered a waypoint using coordinates, and the location of the point does not appear where the point should be, the map datum and position format of the device may not match the map datum and position format originally used to mark the waypoint.
Position format is the way in which the GPS receiver's position appears on the screen. This is commonly displayed as latitude/longitude in degrees and minutes, with options for degrees, minutes and second, degrees only, or one of several grid formats.
Map datum is a math model which depicts a part of the surface of the earth. Latitude and longitude lines on a paper map are referenced to a specific map datum.
- Find out which map datum and position format was used when the original waypoint was created.
If the original waypoint was taken from a map, there should be a legend on the map that lists the map datum and position format used to create that map. Most often this is found near the map key. - Select Settings > Units.
- Select the correct map datum and position format settings.
- Create the waypoint again.
Download Garmin Striker 4 GPS Fish Finder Owner's manual

| Brand | Garmin |
| Model | Striker 4 |
| Category |
Fish Finder |
| File Size | 1.36 Mb |
| Pages | 13 pages |
| Language | English |
| 2967 views | |